
Finishing Julie’s Star Light Quilt with Wishbone Quilting and Light Blue Thread
Some quilts arrive already full of personality, even before a single quilting stitch is added. Julie’s Star Light quilt was one of those projects.
The moment I unfolded it, the color story set the tone: cheerful yellow, calming blue, and crisp star shapes from the Star Light kit. It had the kind of balance quilters love. The yellow brought warmth and energy, while the blue settled everything down just enough. Together, they gave the quilt a bright, clean look without feeling too busy.

Finishing a quilt like this is both a technical job and a personal one. The piecing deserves care. The fabric choices deserve respect. The quilting needs to add movement, texture, and strength without taking over the design. For Julie’s quilt, the Wishbone quilting pattern and light blue thread turned out to be a beautiful match.
The Star Light colors set the direction
The Star Light kit gave this quilt its strong foundation. Yellow and blue can go in many directions, depending on shade and placement. In this quilt, the yellow felt sunny and inviting, while the blue added a cool, steady contrast.
That color pairing matters when choosing quilting details. A bold thread or dense pattern could have competed with the star blocks. A design that was too plain might have left the quilt feeling unfinished. The goal was to find a quilting plan that supported the piecing and made the whole quilt feel complete.
The stars were the first thing I noticed, but the background and secondary shapes also needed attention. Good quilting should guide the eye across the quilt, not stop it in one spot. With yellow and blue fabrics, texture becomes especially important because light catches each color differently.
On the yellow sections, quilting lines show more clearly. On the blue sections, they soften and blend. That gave me a chance to use one thread color in two different ways. In some areas it would stand out gently. In others, it would recede and let the piecing shine.

Before loading the quilt, I spent time looking at it from a few angles. I like to view a quilt close up, then step back. Close up, I can see seams, pressing direction, and fabric scale. From a distance, I can see the overall design and decide what kind of quilting movement the quilt wants.
Julie’s Star Light quilt wanted curves.
Why the Wishbone pattern was the right choice
The Wishbone pattern is a flowing, repeated quilting design made with smooth curves that meet and separate in a steady rhythm. It has a graceful back-and-forth motion, which makes it a strong choice for quilts with angular piecing.
Star blocks naturally have points, corners, and sharp intersections. The Wishbone design softens those angles without hiding them. That contrast is part of what makes the finished quilt pleasing. The piecing gives structure. The quilting adds movement.
The name also has a sweet meaning. A wishbone often brings to mind hope, luck, and the small wishes we make for people we care about. That made it feel especially fitting for a quilt being finished for someone special. A quilt already carries time, skill, and affection. Adding a pattern with that sense of hope felt like the right finishing touch.
The Wishbone pattern also works well from a practical quilting perspective.
It gives:
Even texture across the quilt surface
Good movement without looking chaotic
Soft curves that balance pointed star blocks
Reliable coverage for a quilt meant to be used and loved
A clean rhythm that works beautifully on a longarm machine
Another reason I liked Wishbone for this quilt was scale. If the pattern were stitched too small, it could make the quilt feel overly dense and distract from the Star Light design. If it were too large, the quilting might not support the quilt evenly. A medium scale gave the quilt enough texture while keeping the stars easy to read.
The best quilting pattern for a pieced top is not always the most dramatic one. Often, it is the one that helps the quilt look like itself, only finished.
That was the goal here. Not to change Julie’s quilt, but to bring it fully to life.

Light blue thread brought the design together
Thread color can change the entire mood of a quilt. For this project, light blue was the clear choice.
A white thread might have looked too stark on the blue fabrics and too bright on the yellow. A yellow thread could have disappeared on the yellow sections but stood out too much on the blue. A darker blue might have made the quilting feel heavier than the quilt needed.
Light blue landed in the middle. It blended softly into the blue pieces and gave just enough contrast on the yellow to show the quilting design. It also connected the two main colors in the quilt. Rather than introducing a new color, the thread repeated one already present in the Star Light kit.
That choice helped the quilt feel cohesive.
On the yellow areas, the light blue thread created a delicate line that made the Wishbone pattern easy to see. It gave the surface texture without overpowering the fabric. On the blue areas, it quieted down and became more about shadow and texture than color.
This is one of my favorite things about thread selection. The same thread can behave differently across a quilt, depending on the fabric beneath it. It can show, whisper, or almost disappear. With Julie’s quilt, light blue did all three.
When choosing thread for a quilt like this, I think about a few things:
How the thread looks on the lightest fabric
How it looks on the darkest fabric
Whether it supports the mood of the quilt
Whether the quilting should stand out or blend
How much contrast the maker would likely enjoy
For this quilt, the thread needed to be visible enough to honor the quilting but gentle enough to keep the stars in charge. Light blue gave that balance.
Preparing the quilt for the longarm
Before quilting begins, preparation makes a huge difference. A longarm machine can create beautiful, even stitching, but it cannot solve every issue on its own. The smoother the quilt loads, the better the final result will be.
I started by checking the quilt top, backing, and batting. The quilt top needed to lie as flat as possible. Any fullness, wavy borders, or uneven edges can become more noticeable once the quilt is under tension on the frame.
Pressing is always worth the time. For star blocks, seams can build up where points meet. A careful press helps the longarm glide over those areas more smoothly. It also helps prevent tiny folds from forming as the machine moves.
The backing needs attention too. It should be larger than the quilt top on all sides so there is enough room to attach it to the frame and quilt safely near the edges. A square backing loads more evenly and reduces the chance of shifting.
Once everything was ready, I loaded the backing, batting, and quilt top onto the frame. The aim was smooth, not stretched. Pulling too tightly can distort the quilt. Leaving it too loose can cause puckers. The sweet spot is firm enough to support the stitching but relaxed enough to let the quilt keep its natural shape.
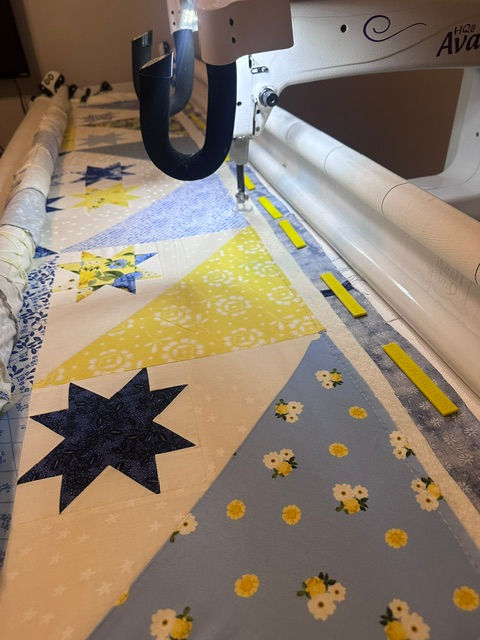
Tips for using a longarm machine effectively
Longarm quilting is part skill, part patience, and part listening to the machine. Each quilt behaves a little differently. Fabric weight, seam bulk, batting loft, and thread choice all affect the stitching.
Here are the longarm habits that helped while finishing Julie’s quilt.
Test the tension before quilting the top
A tension test saves frustration. I always like to test the top thread, bobbin thread, needle, and batting combination before moving onto the actual quilt.
Look for:
Balanced stitches on the top and back
No eyelashes on curves
No thread breaks
No loose bobbin dots showing through
Smooth movement around curves
Keep the machine speed steady
Wishbone quilting depends on rhythm. If the machine moves too fast in one area and slows sharply in another, stitch length can look uneven, especially on curves.
A steady pace creates smoother lines. It also helps the pattern look intentional from row to row. This does not mean rushing. Longarm quilting often looks best when the movement feels calm and controlled.
Watch the path ahead, not only the needle
It is easy to stare right at the needle, especially when quilting curves. But smoother quilting comes from watching where the design is going next. The needle matters, of course, but the path matters more.
For Wishbone, I like to keep my eyes slightly ahead of the stitching line. That helps the curves stay rounded and keeps the spacing more consistent.
Advance the quilt with care
Every time the quilt advances on the frame, the surface needs to be checked again. Smooth the top. Check the sides. Make sure the quilt is not drifting or pulling.
Small adjustments at each advance prevent bigger problems later. This is especially true on quilts with strong geometric piecing, where distortion can be easier to see.
Respect the seams
Star quilts often have seam intersections that are thicker than the surrounding fabric. A longarm can stitch over them, but it helps to slow slightly when crossing bulky points.
That small change protects the thread and needle. It also keeps the stitching line from wobbling where the foot passes over extra thickness.
Do not skip basting the edges
Basting the sides and top edge keeps the quilt layers stable. It is not the most exciting step, but it gives the quilting a cleaner start and helps prevent tucks along the edges.
For Julie’s quilt, those little preparation steps supported the final look. The Wishbone pattern had room to flow, and the quilt stayed smooth from the first pass to the last.
The quilting changed the feel of the whole quilt
One of the most satisfying parts of longarm quilting is seeing the quilt transform pass by pass. A pieced top is beautiful on its own, but quilting gives it dimension. It turns fabric and seams into something with weight, texture, and drape.
As the Wishbone pattern moved across Julie’s quilt, the stars began to feel more connected. The yellow and blue areas no longer looked like separate pieces of the design. The quilting tied them together with a soft, repeated motion.

The light blue thread did exactly what I hoped it would do. It brightened the yellow without making it look busy. It blended into the blue without disappearing completely. When the light hit the quilt from the side, the texture became even more visible.
That moment is always special. You can plan the pattern, choose the thread, and prepare the quilt carefully, but there is still a little surprise when everything comes together. The finished texture reveals itself only after the stitching begins.
There is joy in that reveal.
Finishing a quilt for someone special
Completing another person’s quilt carries a certain kind of responsibility. Julie had already chosen the fabrics, pieced the top, and trusted me with the finishing step. That trust is never lost on me.
A quilt top represents hours of decisions. Which fabric goes where. How the blocks are arranged. How the seams meet. Whether to keep going when a point is not perfect. By the time it reaches the longarm, it already has a story.
My part is to honor that story.
With Julie’s Star Light quilt, I wanted the quilting to feel warm, careful, and joyful. The yellow and blue fabrics had such a fresh look, and the Wishbone pattern added a sense of movement that suited them. The light blue thread became the quiet connector, pulling the top together without stealing attention.
There is also a personal joy in finishing a project that will leave the studio and return to someone who has been waiting to see it complete. The final trim, the last look over the stitches, the moment the quilt comes off the frame, all of it feels meaningful.
A finished quilt has presence. It can be folded over a chair, spread across a bed, gifted, displayed, or used every day. It is both practical and personal. That is the beauty of quilting.

A few takeaways from Julie’s Star Light quilt
This project is a good reminder that quilting choices do not need to be complicated to be effective. Each choice simply needs to support the quilt.
For a strong finish:
Choose a quilting pattern that balances the piecing
Let thread color connect the fabrics
Test tension before stitching the quilt
Keep longarm movement steady and relaxed
Slow down over bulky seams
Step back often to see the whole design
Julie’s quilt worked so well because the elements supported one another. The Star Light pattern gave it cheerful yellow and blue fabrics. The Wishbone pattern added graceful movement. The light blue thread brought the design together with softness and clarity.
Finishing this quilt was a pleasure from start to finish. It had color, shape, meaning, and that wonderful moment when the last stitches made everything feel complete. For a quilter, there are few better feelings than taking a beautiful top and helping it become a quilt ready to be loved.


Comments